Introduction
Git is a widely used system (both in academia and industry) for version controlling files and collaborating on code. It is used to track changes in (text) files, thereby establishing a history of all edits made to each file, together with short messages about each change and information about who made it. Git is mainly run from the command line, but there are several tools that have implemented a graphical user interface to run git commands.
Using version control for tracking your files, and edits to those, is an essential step in making your computational research reproducible. A typical git workflow consists of:
-
Making distinct and related edits to one or several files
-
Committing those changes (i.e. telling git to add those edits to the history, together with a message about what those changes involve)
-
Pushing the commit to a remote repository (i.e. syncing your local project directory with one in the cloud)
There are many benefits of using git in your research project:
-
You are automatically forced into a more organized way of working, which is usually a first step towards reproducibility.
-
If you have made some changes to a file and realize that those were probably not a good idea after all, it is simple to view exactly what the changes were and revert them.
-
If there is more than one person involved in the project, git makes it easy to collaborate by tracking all edits made by each person. It will also handle any potential conflicting edits.
-
Using a cloud-based repository hosting service (the one you push your commits to), like e.g. GitHub or Bitbucket, adds additional features, such as being able to discuss the project, comment on edits, or report issues.
-
If at some point your project will be published GitHub or Bitbucket (or similar) are excellent places to publicly distribute your code. Other researchers can then use git to access the code needed for reproducing your results, in exactly the state it was when used for the publication.
-
If needed, you can host private repositories on GitHub and Bitbucket as well. This may be convenient during an ongoing research project, before it is publicly published.
These tutorials will walk you through the basics of using git as a tool for reproducible research. The things covered in these tutorials are what you will be using most of the time in your day-to-day work with git, but git has many more advanced features that might be of use to you. If you are interested in learning more about these things, here are some reading tips for you:
This tutorial depends on files from the course GitHub repo. Take a look at the setup for instructions on how to set it up if you haven't done so already.
Creating a git repository
In order to create a new git repository, we first need a directory to track.
For this tutorial, go ahead and create a directory called git_tutorial, then
navigate into it.
Attention
The directory should not be within the workshop-reproducible-research
directory, since this is itself a git-tracked directory.
Once we are inside the desired directory, we can initialise git with the following command:
git init
The directory is now a version-tracked directory. How can you know? Run the
command git status, which will probably return something like this:
On branch main

No commits yet

nothing to commit (create/copy files and use "git add" to track)
Tip
If you try to run git status in a non-git directory, it will say
that it is not a git repository. The way this works is that git
adds a hidden directory .git/ in the root of a git tracked
directory (run ls -a to see it). This hidden directory contains
all information and settings git needs in order to run and version
track your files. This also means that your git-tracked directory
is self-contained, i.e. you can simply delete it and everything that
has to do with git in connection to that directory will be gone.
The text nothing to commit (create/copy files and use "git add" to track)
tells us that while we are inside a directory that git is currently tracking,
there are currently no files being tracked; let's add some!
-
Copy the following files from the
workshop-reproducible-research/gitdirectory into yourgit_tutorialdirectory:DockerfileSnakefileconfig.ymlenvironment.yml
-
Once you have done that, run
git statusagain. It will tell you that there are files in the directory that are not version tracked by git.
Note
For the purpose of this tutorial, the exact contents of the files you just copied are not important. But you will probably recognize many of them, as they are all files used in the MRSA case study described in the introduction to the tutorials. The details of what these files do are described in their respective sessions later in the course, but we provide a brief overview here:
- The
environment.ymlfile contains the Conda environment with all the software used in the analysis (see the Conda tutorial). - The
Snakefileandconfig.ymlare both used to define the Snakemake workflow, that we'll go through in the Snakemake tutorial. - The
Dockerfilecontains the recipe for making a Docker container for the analysis, which will be covered in detail in the Docker tutorial.
Quick recap
We have used two git commands this far:
git inittells git to track the current directory.git statusis a command you should use a lot. It will tell you, amongst other things, the status of your git clone in relation to the online remote repository.
Committing changes
We will now commit the untracked files. A commit is essentially a set of changes to a set of files. Preferably, the changes making out a commit should be related to something, e.g. a specific bug fix or a new feature.
- Our first commit will be to add the copied files to the repository. Run the
following: (as suggested by
git status):
git add Dockerfile Snakefile
-
Run
git statusagain! See that we have added Dockerfile and Snakefile to our upcoming commit (listed under "Changes to be committed"). This is called the staging area, and the files there are staged to be committed. -
We might as well commit all files in one go! Use
git addon the remaining files as well:
git add config.yml environment.yml
-
Run
git statusand see that all files are in the staging area, and that no files are listed as untracked. -
We are now ready to commit! Run the following:
git commit -m "Add initial files"
The -m option adds a commit message. This should be a short description of
what the commit contains.
Tip
Writing informative and succinct commit messages can be tricky when you're just starting out. Here are some general guidelines that can help you write good commit messages from the start:
- Separate subject from body with a blank line
- Limit the subject line to 50 characters
- Capitalize the subject line
- Do not end the subject line with a period
- Use the imperative mood in the subject line
- Wrap the body at 72 characters
- Use the body to explain what and why vs. how
In the command above we just added a short subject line ("Add initial
files"). It is capitalized, less than 50 characters, does not end with
a period, and uses imperative mood (Add!). It is possible to add
a descriptive body text as well, as hinted by the points above. This is
easiest done in a text editor. If you run git commit without the -m
flag, git will open the default terminal text editor (which can be
configured with the core.editor variable) where you can write a longer
commit message and body. If you want to read more about the motivation for
these points, please see this website.
- Run
git statusagain. It should tell you "nothing to commit, working directory clean".
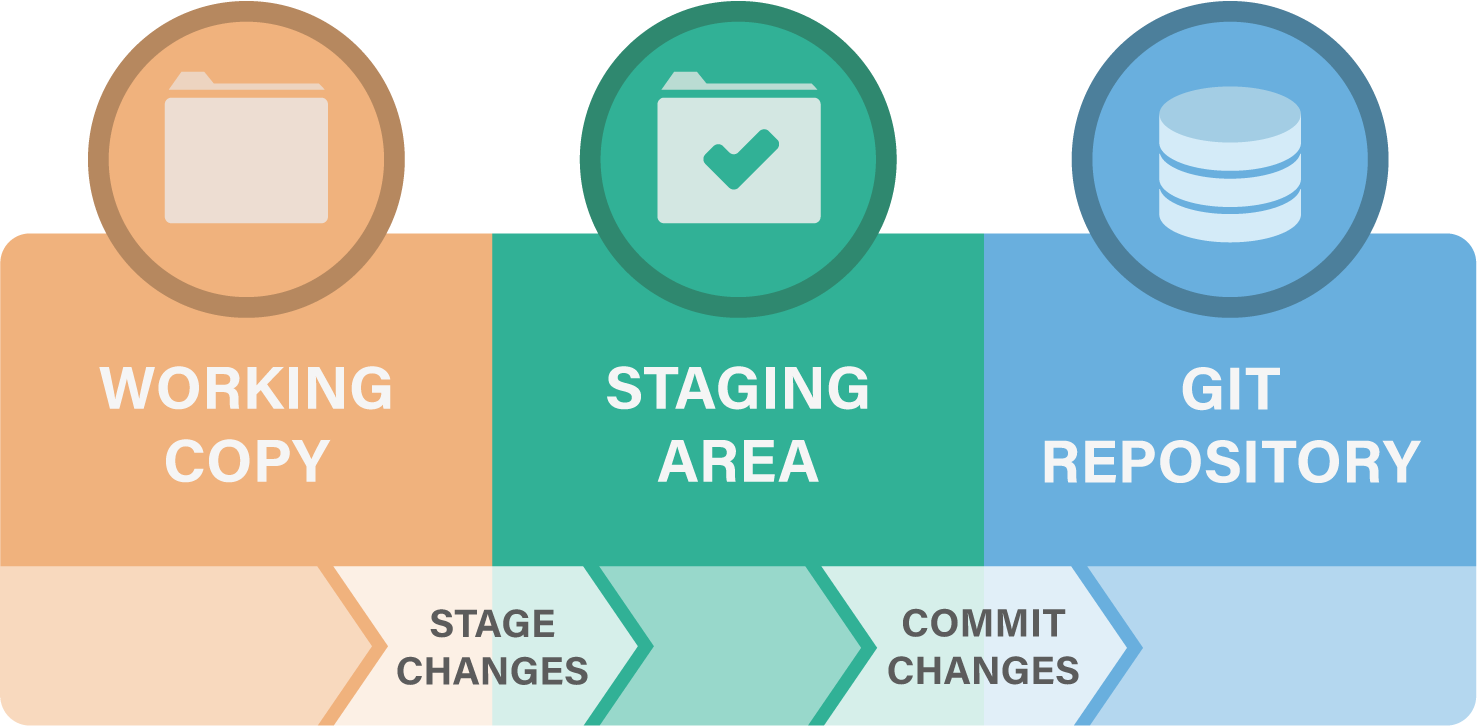
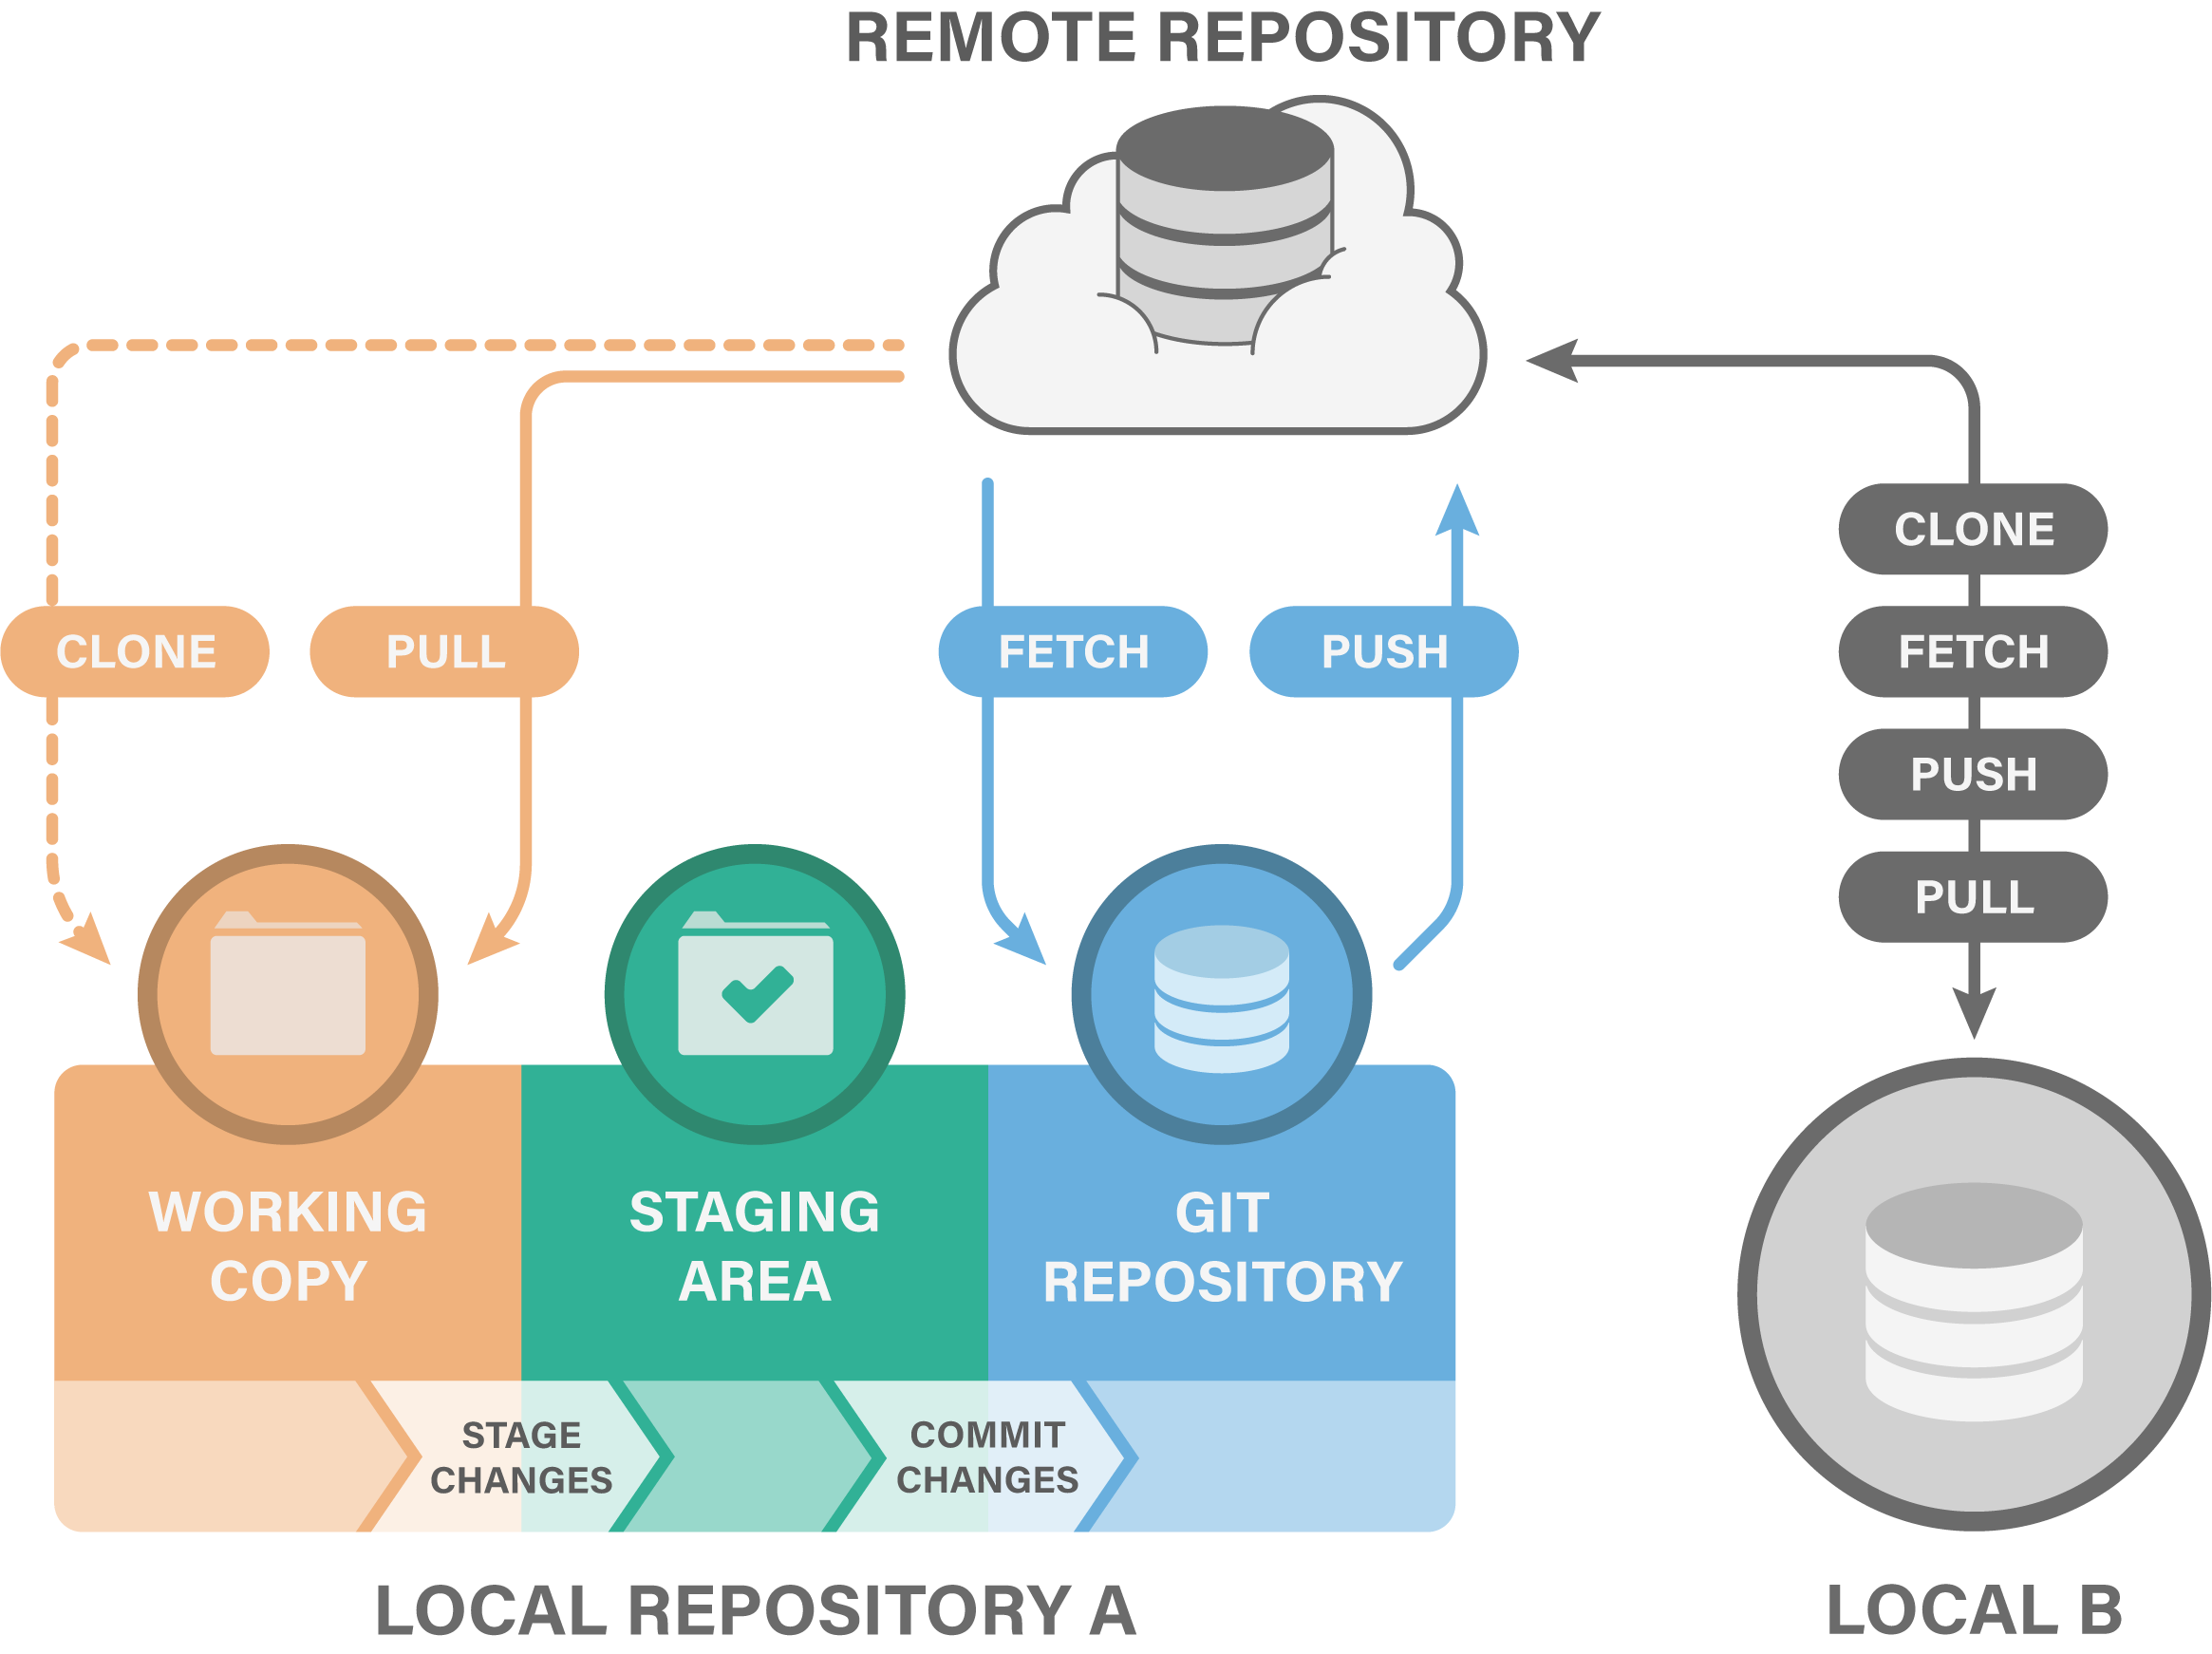
What have we done, so far? We had some files in our working directory that we added to the Git staging area, which we subsequently committed to our Git repository. A schematic overview of this process can be seen in the following figure:
Let's repeat this process by editing a file!
-
Open up
environment.ymlin your favorite editor, and change the version of bowtie2 to a different value, e.g.bowtie2=2.2.4. -
Run
git status. It will tell you that there are modifications in one file (environment.yml) compared to the previous commit. This is nice! We don't have to keep track of what files we have edited, git will do that for us. -
Run
git diff environment.yml. This will show you the changes made to the file. A-means a deleted line, a+means an added line. There are also shown a few lines before and after the changes, to put them in context. -
Let's edit another file! Open
config.ymland change the linegenome_id: NCTC8325togenome_id: ST398. Rungit status. Rungit diff. If we don't specify a file, it will show all changes made in any file, compared to the previous commit. Do you see your changes? -
Ok, we made our changes. Let's commit them! Run:
git add config.yml environment.yml
This will add both our files to the staging area at the same time. Run git
status and see that the changes in both config.yml and environment.yml are
ready to be committed.
But wait a minute! Shouldn't each commit optimally be a conceptual unit of change? Here we have one change to the genome ID used for an analysis and one change a where another software version is specified: these should probably be separate. We thus want to make two commits, one for each change.
- Let's remove
environment.ymlfrom the staging area.git statustells us how to do this: "(use "git reset HEAD..." to unstage)" . So run:
git reset HEAD environment.yml
Note
Maybe you didn't see the same message as indicated above? Is Git telling you
to use a git restore instead? This is another one of Git's newer and
experimental commands, which aims to remove some confusion about what
commands do what (as many have multiple functions). While we have opted to
stick with the old and stable commands until the new commands are no longer
considered experimental, you are very welcome to use git restore instead
of git reset to unstage the file above!
-
Run
git statusagain. See that now onlyconfig.ymlis staged for being committed, whereas the changes inenvironment.ymlare tracked by git, but not ready to be committed. -
Commit the changes in
config.yml:
git commit -m "Change to ST398 for alignment"
- Add and commit the changes in
environment.yml:
git status
git add environment.yml
git status
git commit -m "Change bowtie2 version"
git status
You don't have to run git status between each command, but it can be useful
in the beginning while learning what each command does.
As you can see, each commit is a point in history. The more often you commit, and the more specific you keep your commits, the better (more fine-grained) history and version tracking you will have of your files.
- We can also try to delete a file:
rm Dockerfile
- Run
git status. As you can see, git tells us that the file is deleted, but that the deletion is not committed. In the same way as we commit edits to files, we need to commit a deletion of a file:
git add Dockerfile
git status
git commit -m "Remove Dockerfile"
git status
git log
Here we used rm Dockerfile to delete the file and git add Dockerfile to
stage the deletion. You can also use git rm Dockerfile to do both these
operations in one step.
- To see a history of our changes so far, run:
git log
Tip
Since Git keeps track of changes in text, e.g. code and text-based documentation, there are some files which you should not commit. Examples of such files are file formats that are not text-based, e.g. Microsoft Word/Excel files or PDFs - although one might sometimes want to track one of these files regardless, such as when you have a static PDF report you received from a sequencing platform that's never going to change. Other files you shouldn't track are vary large text files, e.g. those larger than 50 MB.
Quick recap
We now added four important git commands to our repertoire:
git addadds a file to the staging area.git commitcommits the changes we have staged.git rmis shorthand forrm <file>; git add <file>.git logshows us the commit history.
Ignoring files
Git is aware of all files within the repository. However, it is not uncommon to have files that we don't want git to track. For instance, our analysis might produce several intermediate files and results. We typically don't track such files. Rather, we want to track the actual code and other related files (e.g. configuration files) that produce the intermediate and result files, given the raw input data.
- Let's make some mock-up intermediate and result files. These are some of the files that would have been generated by the Snakemake workflow if it was run.
mkdir intermediate
mkdir results
touch intermediate/multiqc_general_stats.txt
touch results/supplementary.pdf
touch log.tmp
- Run
git status. You will see that git tells you that you have untracked files. However, we don't want git to track these files anyway. To tell git what files to ignore we use a file called.gitignore. Let's create it:
touch .gitignore
- Open the
.gitignorefile in an editor and add the following lines to it:
# Ignore these directories:
results/
intermediate/

# Ignore temporary files:
*.tmp
-
Run
git statusagain. Now there is no mention of theresultsandintermediatedirectories or thelog.tmpfile. Notice that we can use wildcards (*) to ignore files with a given pattern, e.g. a specific extension. -
Sometimes you want to ignore all files in a directory with one or two exceptions. For example, you don't want to track all your huge raw data files, but there may be a smaller data file that you do want to track, e.g. metadata or a list of barcodes used in your experiment. Let's add some mock data:
mkdir data
touch data/huge.fastq.gz
touch data/metadata.txt
- Git allows you to ignore all files using the aforementioned wildcard, but
then exclude certain files from that ignore command. Open the
.gitignorefile again and add the following:
# Ignore all files in the data/ directory
data/*

# Exclude the metadata file by prefixing it with an exclamation mark
!data/metadata.txt
- Finish up by adding the
.gitignoreanddata/metadata.txtfiles to the staging area and committing them:
git add .gitignore
git commit -m "Add .gitignore file"
git add data/metadata.txt
git commit -m "Add metadata file"
Tip
It is common for certain programming languages or text editors to leave
e.g. swap files or hidden data files in the working directory, which you
don't want to track using git. Instead of manually adding these to every
single project you have, you can use the .gitignore_global file, which
should be placed in your home directory. It works exactly like a normal
gitignore file, but is applied to all git repositories that you are using
on your machine. Some common file extensions that might be put in the
global gitignore are .DS_Store if you're working in R or .swp if you're
coding in vim.
Quick recap
We now learned how to ignore certain files and directories:
- The
.gitignorefile controls which files and directories git should ignore, if any. - Specific files can be excluded from ignored directories using the
exclamation mark (
!) prefix.
Branching and merging
One of the most useful features of git is called branching. Branching allows you to diverge from the main line of work and edit or update your code and files (e.g. to test out a new analysis or some experimental feature) without affecting your main work. If the work you did in the branch turns out to be useful you can merge that back into your main branch. On the other hand, if the work didn't turn out as planned, you can simply delete the branch and continue where you left off in your main line of work. Another use case for branching is when you are working in a project with multiple people. Branching can be a way of compartmentalizing your team's work on different parts of the project and enables merging back into the main branch in a controlled fashion; we will learn more about this in the section about working remotely.
- Let's start trying out branching! We can see the current branch by running:
git branch
This tells us that there is only the main branch at the moment.
- Let's make a new branch:
git branch test_alignment
-
Run
git branchagain to see the available branches. Do you note which one is selected as the active branch? -
Let's move to our newly created branch using the
checkoutcommand:
git checkout test_alignment
Tip
You can create and checkout a new branch in one line with git checkout -b
branch_name.
Let's add some changes to our new branch! We'll use this to try out a different set of parameters on the sequence alignment step of the case study project.
- Edit the
Snakefileso that the shell command of thealign_to_genomerule looks like this (add the--very-sensitive-localoption):
shell("bowtie2 --very-sensitive-local -x " + indexBase + " -U {input.fastq} \
    > {output} 2> {log}")
-
Add and commit the change!
-
To get a visual view of your branches and commits you can use the command:
git log --graph --all --oneline
It is often useful to see what differences exist between branches.
You can use the diff command for this:
git diff main
This shows the difference between the active branch (test_alignment) and main
on a line-per-line basis. Do you see which lines have changed between
test_alignment and main branches?
Tip
We can also add the --color-words flag to git diff, which instead
displays the difference on a word-per-word basis rather than line-per-line.
Note
Git is constantly evolving, along with some of its commands. While the
checkout is quite versatile (it's used for more than just switching
branches), this versatility can sometimes be confusing. The Git team thus
added a new command, git switch, that can be used instead. This command is
still experimental, however, so we have opted to stick with checkout for
the course - for now.
Now, let's assume that we have tested our code and the alignment analysis is run
successfully with our new parameters. We thus want to merge our work into the
main branch. It is good to start with checking the differences between
branches (as we just did) so that we know what we will merge.
- Checkout the branch you want to merge into, i.e.
main:
git checkout main
- To merge, run the following code:
git merge test_alignment
Run git log --graph --all --oneline again to see how the merge commit brings
back the changes made in test_alignment to main.
Tip
If working on different features or parts of an analysis on different
branches, and at the same time maintaining a working main branch for the
stable code, it is convenient to periodically merge the changes made to
main into relevant branches (i.e. the opposite to what we did above).
That way, you keep your experimental branches up-to-date with the newest
changes and make them easier to merge into main when time comes.
- If we do not want to do more work in
test_alignmentwe can delete that branch:
git branch -d test_alignment
- Run
git log --graph --all --onelineagain. Note that the commits and the graph history are still there? A branch is simply a pointer to a specific commit, and that pointer has been removed.
Tip
There are many types of so-called "branching models", each with varying
degrees of complexity depending on the developer's needs and the number of
collaborators. While there certainly isn't a single branching model that
can be considered to be the "best", it is very often most useful to keep it
simple. An example of a simple and functional model is to have a main
branch that is always working (i.e. can successfully run all your code
and without known bugs) and develop new code on feature branches (one new
feature per branch). Feature branches are short-lived, meaning that they
are deleted once they are merged into main.
Quick recap
We have now learned how to divide our work into branches and how to manage them:
git branch <branch>creates a new branch.git checkout <branch>moves the repository to the state in which the specified branch is currently in.git merge <branch>merges the specified branch into the current one.
Tagging commits
Git allows us to tag commits, i.e. give names to specific points in the history of our project. This can be particularly important for reproducible research, but also for development projects that want to highlight specific versions of a software. A tag can be, for example, the version of the repository that was used for the manuscript submission, the version used during resubmission, and, most importantly, the version used for the final publication. The first two examples are mainly useful internally, but the latter is essential for other researchers to be able to rerun your published analysis.
- Let's assume that the status of the repository as it is now is ready for a submission to a journal. It may for example contain the scripts that were used to generate the manuscript figures. Let's add a tag:
git tag "submission1"
- We can now list all the tags available in the current repository:
git tag
Tip
You can use the flag -a or --annotate to give more detailed information
about a specific tag, similar to a commit message. This can be quite useful
when there are many changes that happened, in that it allows you to
summarise them. You can, for example, do git tag -a submission1 -m
"Annotation for tag submission1" to write the annotation along with the
command (similar to the -m flag for committing) or just git tag -a
submission1 to write the annotation with your default editor.
To list all your tags along with their annotations you can use e.g. git
tag -n10 (which will list the first 10 lines of each tag's annotation).
- Let's assume we now got comments from the reviewers, and by fixing
those we had to update our code. Open
config.ymland change the linemax_reads: 25000tomax_reads: 50000. Commit and tag the changes:
git add config.yml
git commit -m "Increase number of reads"
git tag "revision1"
- Now let's say that the reviewers were happy and the manuscript was accepted for publication. Let's immediately add a tag:
git tag "publication"
- A good thing about using tags is that you can easily switch between versions of your code. Let's move to the first submission version:
git checkout submission1
- Open
config.ymland note that themax_readsvariable is25000! To go back to the latest version, run:
git checkout main
- Open
config.ymland see that the value is now50000.
Tip
You can also see the difference between tags in the same way as for
branches and commits using e.g. git diff <tag1> <tag2>.
- Finally, you could run
git log --oneline --decorateto get a condensed commit history, where you should also be able to see the tagged commits.
Quick recap
We have now learned how to tag important commits:
git tagadds a tag to a commit.git checkoutmoves between tags in a similar fashion as between branches.
Working remotely
So far we've only been working on files present on our own computer, i.e. locally. While git is an amazing tool for reproducibility even if you're working alone, it really starts to shine in collaborative work. This entails working with remote repositories, i.e. repositories that are stored somewhere online; some of the most common places to store your repositories are GitHub, BitBucket and GitLab. GitHub is the most popular of these, and is what we'll be using for this tutorial.
An important thing to keep in mind here is the difference between git (the version control system) and online hosting of git repositories (such as GitHub): the former is the core of keeping track of your code's history, while the latter is how to store and share that history with others.
Create an account at GitHub
If you have not done so already, go to github.com and create an account. You can also create an account on another online hosting service for version control, e.g. Bitbucket or GitLab. The exercises below are written with examples from GitHub (as that is the most popular platform with the most extensive features), but the same thing can be done on alternative services, although the exact menu structure and link placements differ a bit.
Create a remote repository
- Log in to your GitHub account and press the New button on the left:
- Make sure you are listed as the owner
- Add a repository name, e.g.
git_tutorial - You can keep the repo private or make it public, as you wish
- Skip including a README, a
.gitignoreand licence
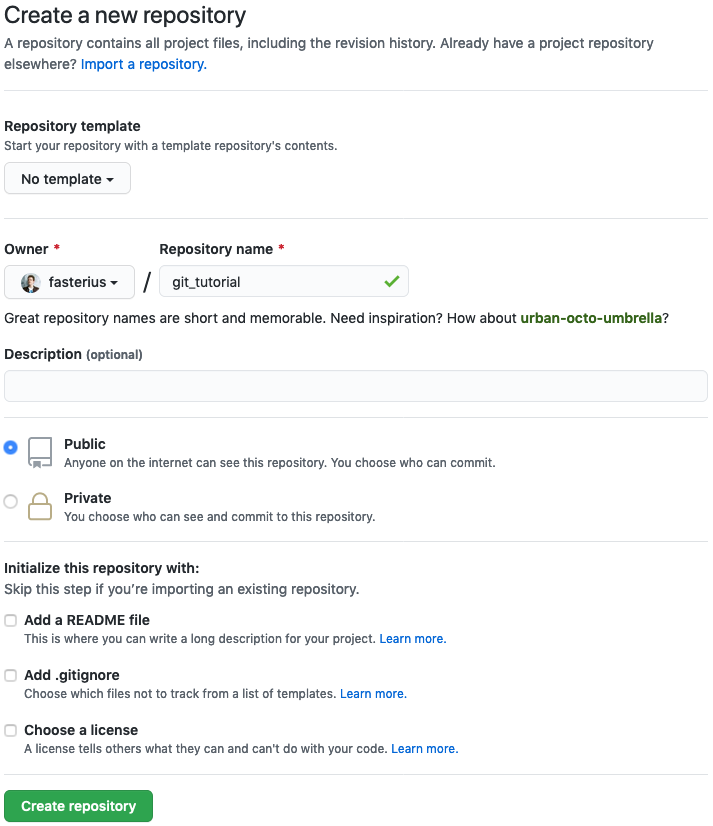
You will now be redirected to the repository page which will list several ways for you to start adding content (files) to the repository. What we will do is to connect the local repository we've been working on so far to the remote GitHub server:
- Add a remote address to your local repository (make sure you change
userto your GitHub username andgit_tutorialto your repository name):
git remote add origin https://github.com/user/git_tutorial.git
-
Run
git remote -v. This will show you what remote location is connected to your local git clone. The short name of the default remote is usually "origin" by convention. -
We have not yet synced the local and remote repositories, though, we've simply connected them. Let's sync them now:
git push origin main
The push command sends our local history of the main branch to the same
branch on the remote (origin). Our git repository is now stored on GitHub!
- Run
git status. This should tell you that "Your branch is up-to-date with 'origin/main'.".
If you go to the repository's GitHub page you should now be able to see all your files and your code there! It should look something like this:

You can see a lot of things there, such as each file and the latest commit that
changed them, the repository's branches and a message from GitHub at the bottom:
"Help people interested in this repository understand your project by adding
a README." This refers to GitHub's built-in functionality of automatically
rendering any markdown document named README or README.md in the
repository's root directory and displaying it along with what you can already
see. Let's try it out!
- Let's create a
README.mdfile and fill it with the following text:
# A Git tutorial

This repository contains tutorial information related to the **NBIS** course
*Tools for Reproducible Research*, specifically the session on using the `git`
software for version control.

## Links

You can find the latest stable version of the Git tutorial for the course
[here](https://nbis-reproducible-research.readthedocs.io/en/latest/git/).
- Add, commit and push these changes to GitHub.
git add README.md
git commit -m "Add README.md"
git push origin main
You should now be able to see the rendered markdown document, which looks a bit
different from the text you copied in from above. Note that there are two
different header levels, which come from the number of hash signs (#) used.
You can also see bold text (which was surrounded by two asterisks), italic
text (surrounded by one asterisk), in-line code (surrounded by acute accents)
and a link (link text inside square brackets followed by link address inside
parentheses).
It is important to add README-files to your repositories so that they are more documented and easily understood by others and, more likely, your future self. In fact, documentation is an important part of reproducible research! While the tools that you are introduced to by this course are all directly related to making science reproducible, you will also need good documentation. Make it a habit of always adding README-files for your repositories, fully explaining the ideas and rationale behind the project. You can even add README-files to sub-directories as well, giving you the opportunity to go more in-depth where you so desire.
Tip
There are a lot more things you can do with markdown than what we show here. Indeed, this entire course is mostly written in markdown! You can read more about markdown here.
Quick recap
We learned how to connect local git repositories to remote locations such as
GitHub and how to upload commits using git push. We also learned the
basics of markdown and how it can be used to document git repositories.
Browsing GitHub
GitHub and the rest of the websites that offer remote hosting of git repositories all have numerous features, which can be somewhat difficult to navigate in the beginning. We here go through some of the basics of what you can do with GitHub.
- Go to your GitHub repository in your browser again and click on Code to the
left. Click on
config.yml. You will see the contents of the file. Notice that it is the latest version, where we previously changed thegenome_idvariable:
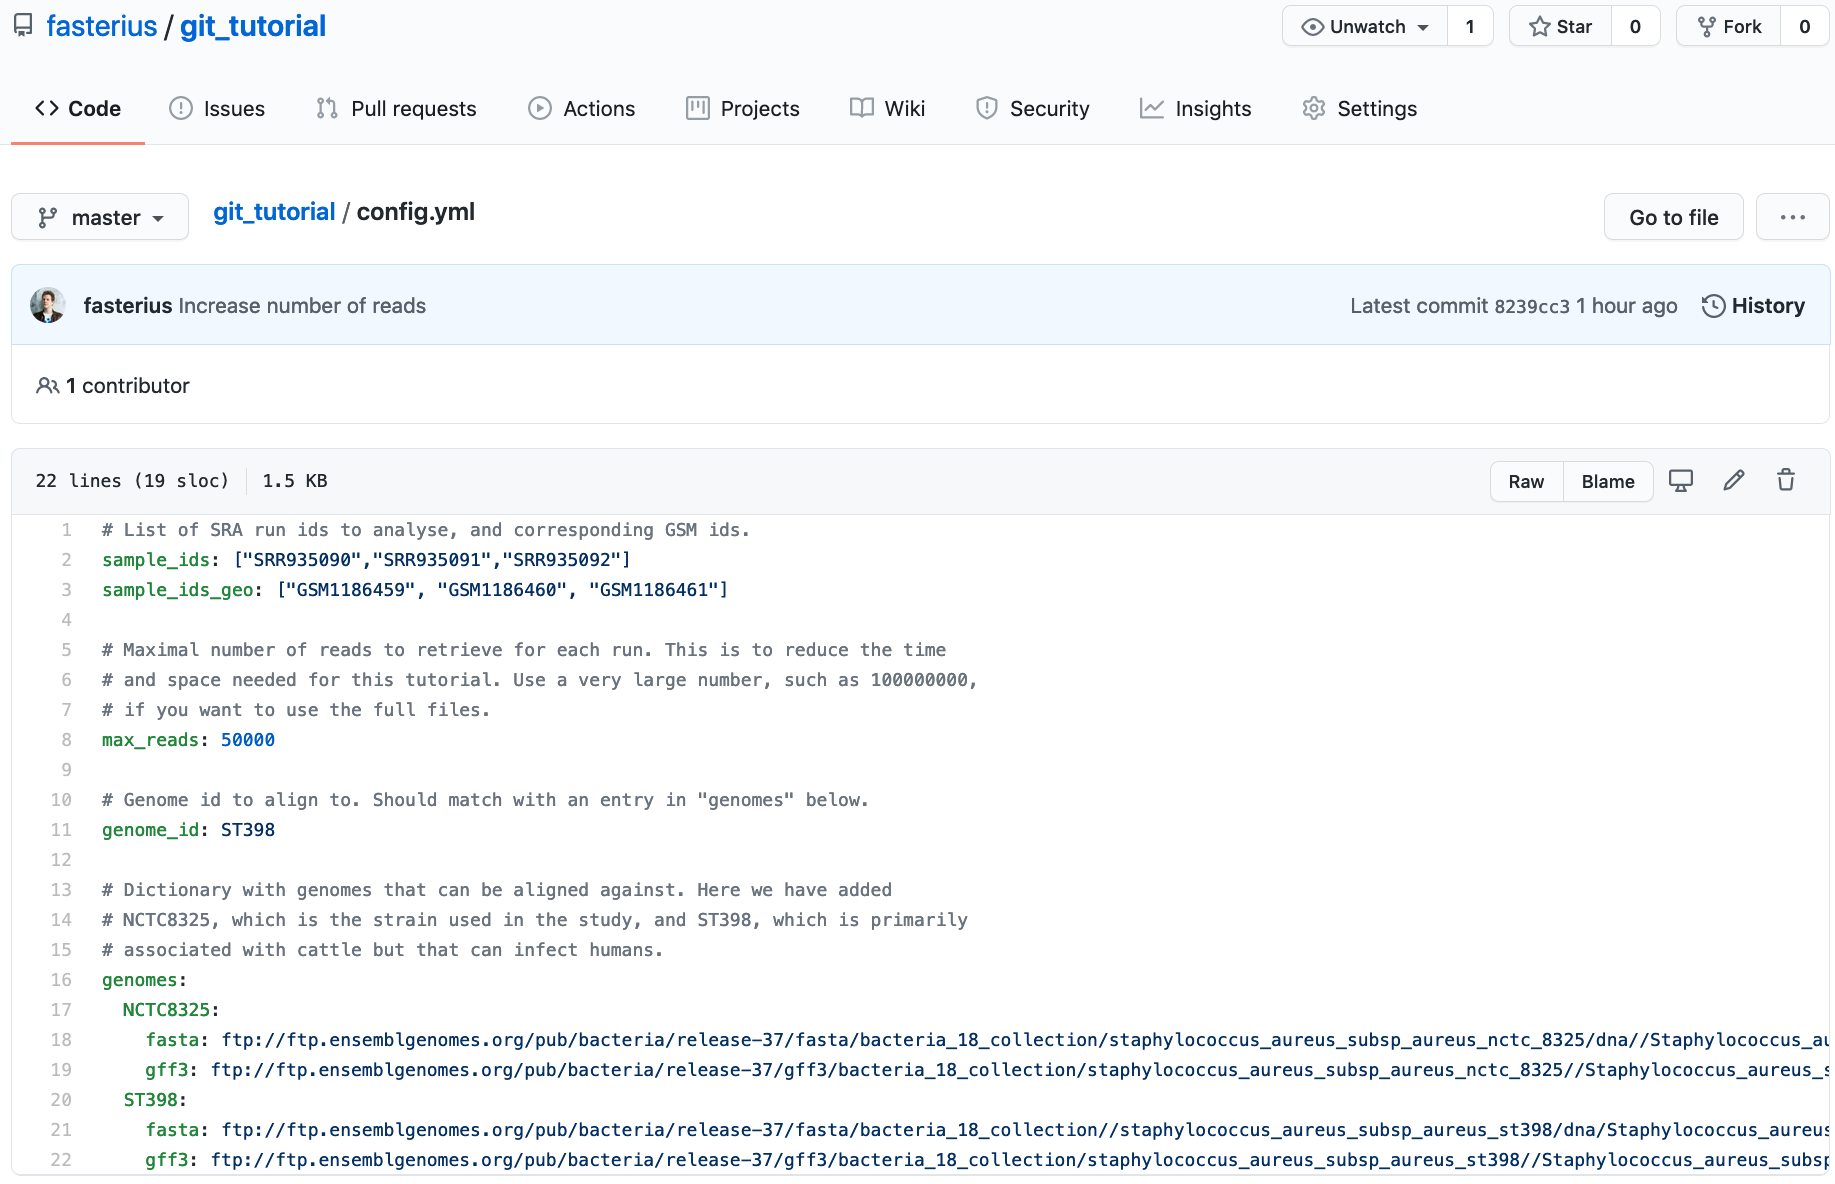
- Click on History. You will see an overview of the commits involving changes made to this file:
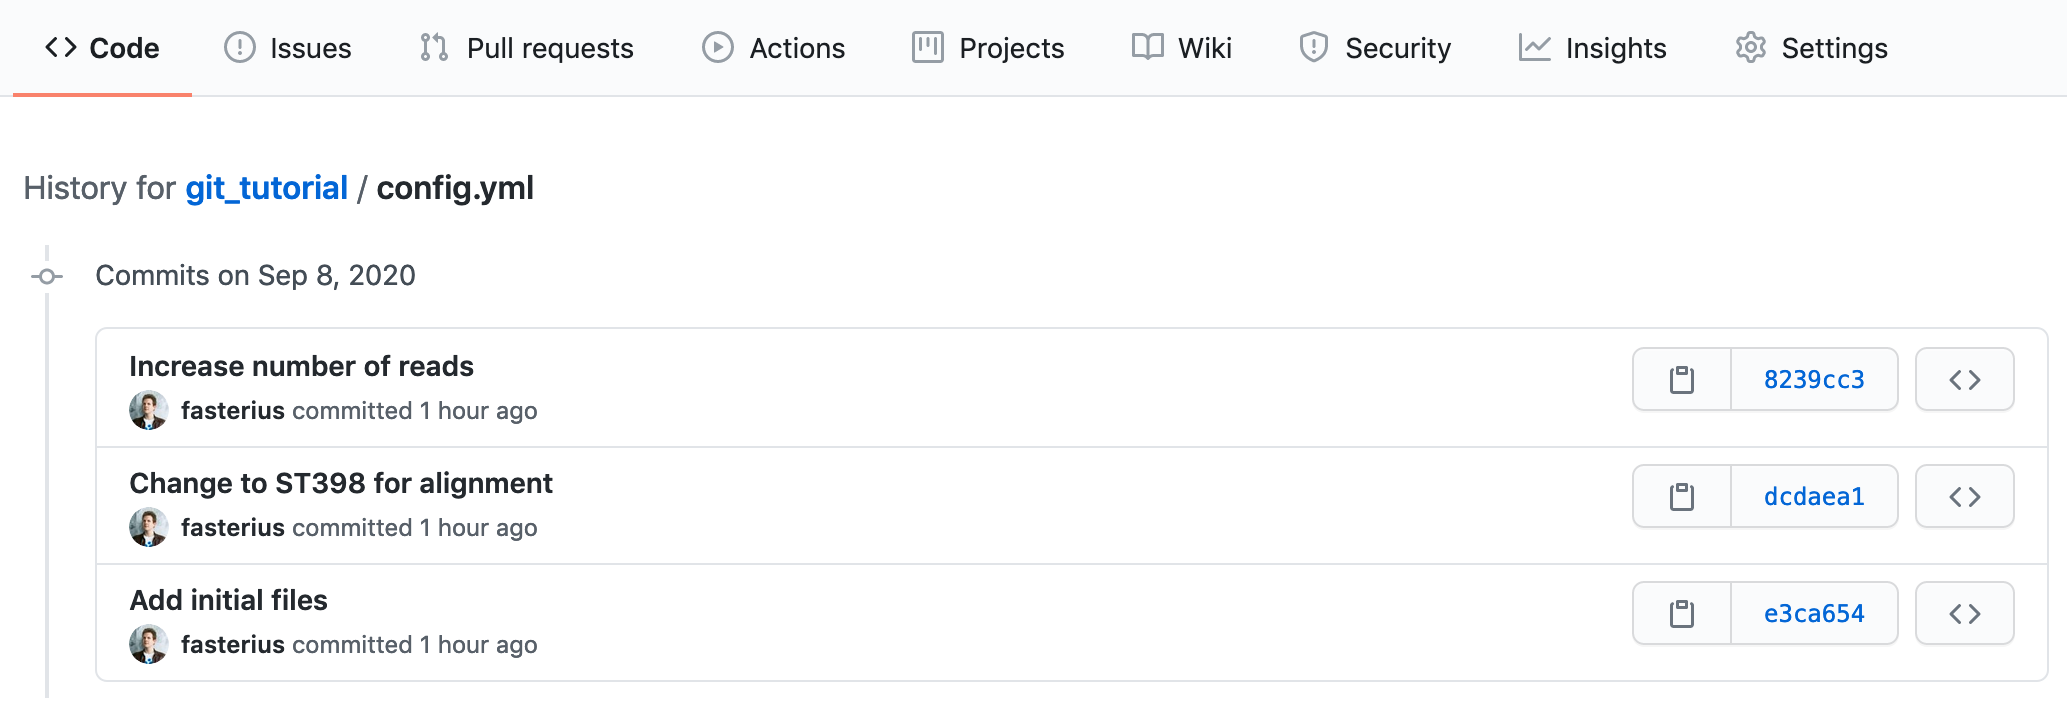
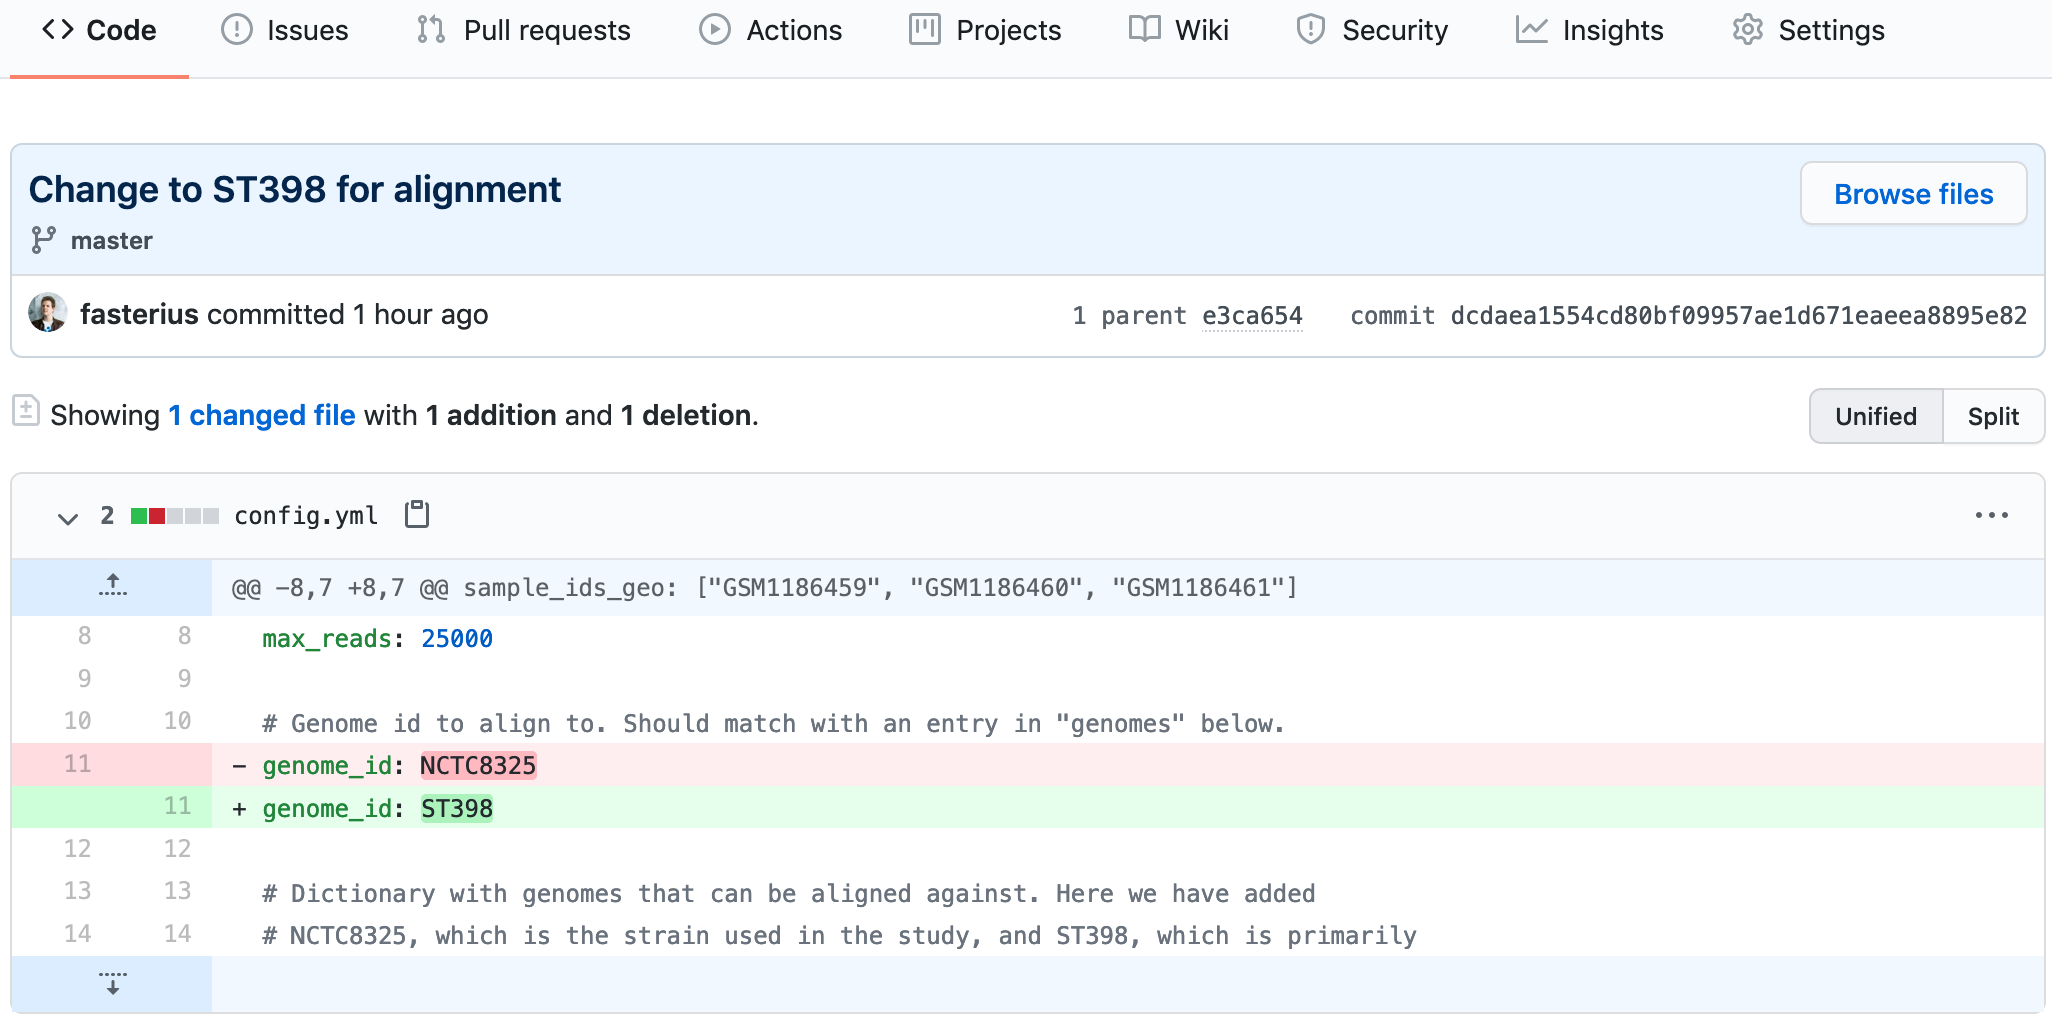
- Click on the
Change to ST398 for alignmentcommit. You will see the changes made toconfig.ymlfile compared to the previous commit.
- Go back to the repository's main page and click on the commit tracker on the right above the list of files, which will give you an overview of all commits made. Clicking on a specific commit lets you see the changes introduced by that commit. Click on the commit that was the initial commit, where we added all the files.
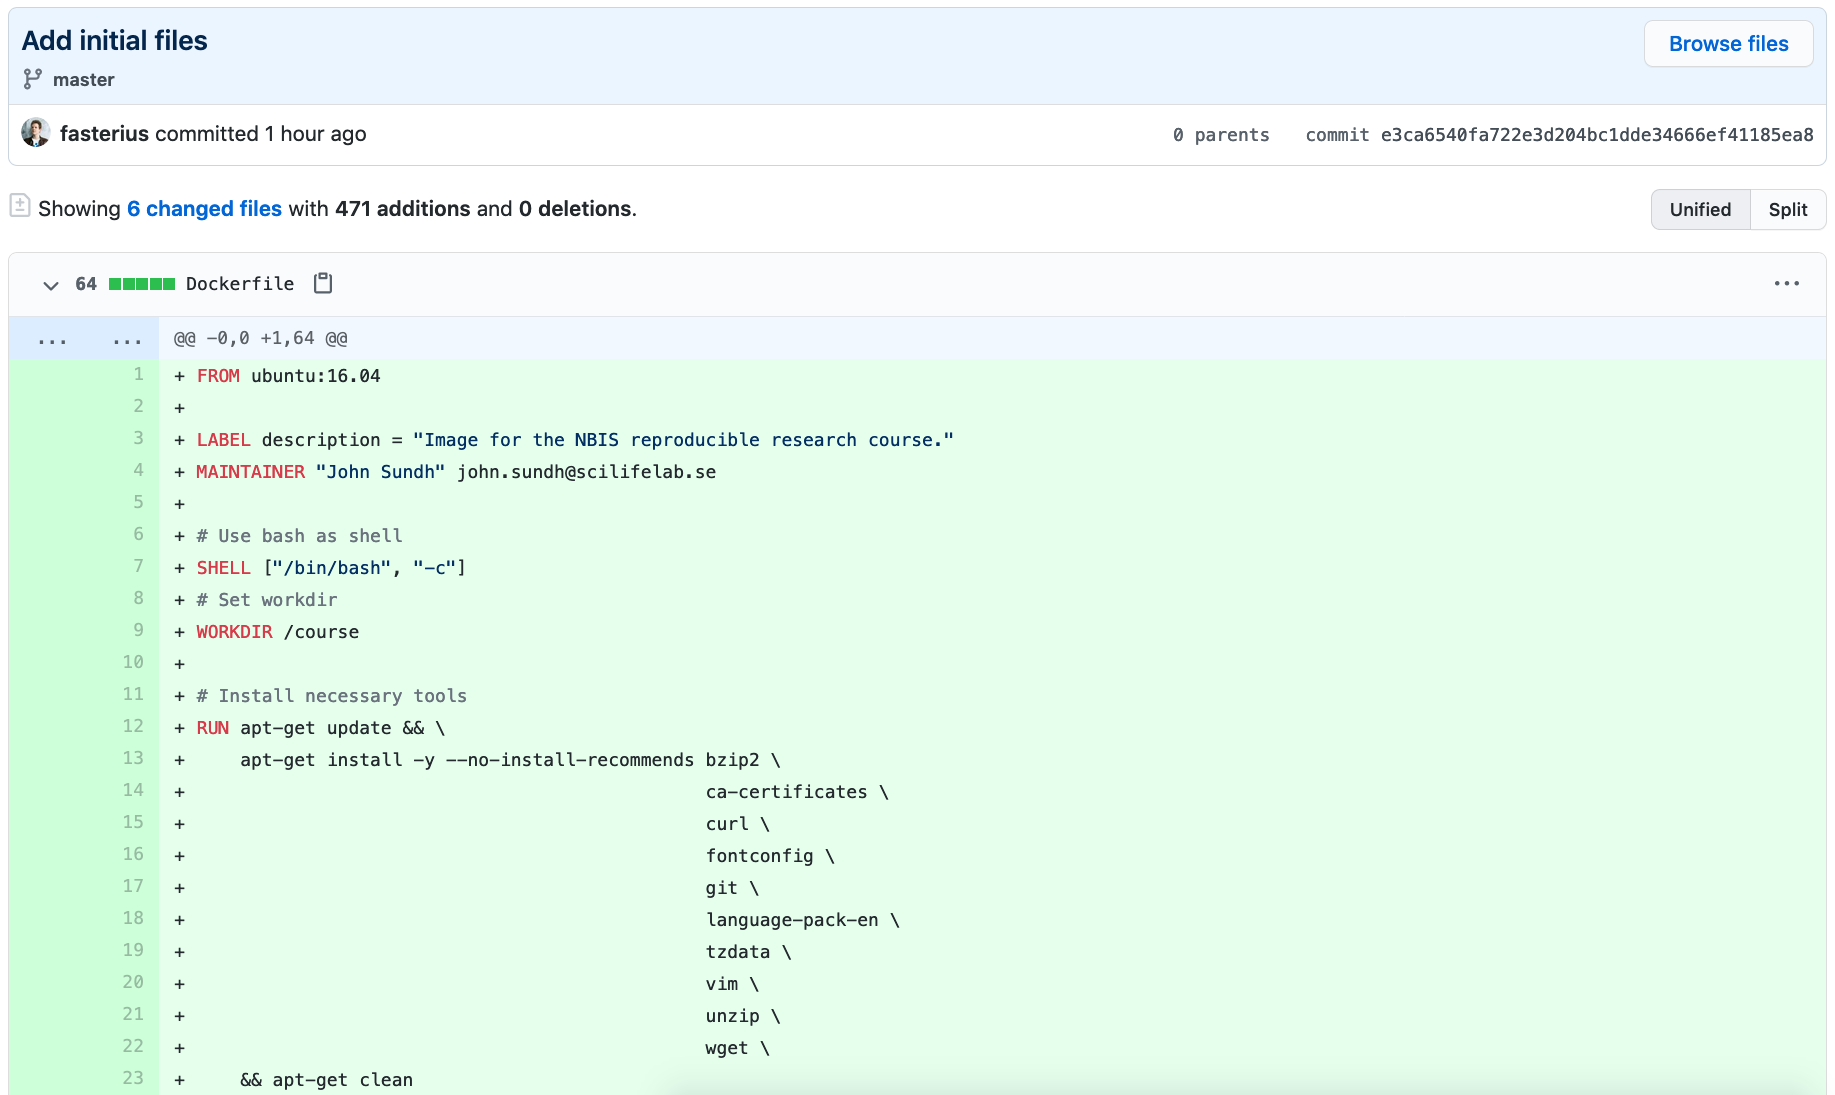
You will now see the files as they were when we first added them. Specifically
you can see that the Dockerfile is back, even though we deleted it! Click on
the Code tab to the left to return to the overview of the latest repository
version.
Quick recap
We learned some of the most important features of the GitHub interface and how repositories can be viewed online.
Working with remote repositories
While remote repositories are extremely useful as backups and for collaborating with others, that's not their only use: remotes also help when you are working from different computers, a computer cluster or a cloud service.
- Let's pretend that you want to work on this repository from a different
computer. First, create a different directory (e.g.
git_remote_tutorial) in a separate location that is not already tracked by git andcdinto it. Now we can download the repository we just uploaded using the following:
git clone https://user@github.com/user/git_tutorial.git .
Notice the dot at the end of the command above, which will put the clone into
the current directory, instead of creating a new directory with the same name as
the remote repository. You will see that all your files are here, identical to
the original git_tutorial repository!
-
Since you already gave the address to git when you cloned the repository, you don't have to add it manually as before. Verify this with
git remote -v. -
Let's say that we now want to change the
multiqcsoftware to an earlier version: open theenvironment.ymlfile in the second local repo and changemultiqc=1.7tomultiqc=1.2; add and commit the change. -
We can now use
pushagain to sync our remote repository with the new local changes. Refresh your web page again and see that the changes have taken effect.
Tip
You always need to specify git push origin main by default, but you can
circumvent this by telling git that you always want to push to
origin/main when you're on your local main branch. To do this, use
the command git branch --set-upstream-to origin/main. Another way to
achieve the same effect is use the --set-upstream flag for the very first
push.
Since we have now updated the remote repository with code that came from the
second local repository, the first local repository is now outdated. We thus
need to update the first local repo with the new changes. This can be done with
the pull command.
-
cdback into the first local repository (e.g.git_tutorial) and run thegit pullcommand. This will download the newest changes from the remote repository and merge them locally automatically. -
Check that everything is up-to-date with
git status.
Another command is git fetch, which will download remote changes without
merging them. This can be useful when you want to see if there are any remote
changes that you may want to merge, without actually doing it, such as in
a collaborative setting. In fact, git pull in its default mode is just
a shorthand for git fetch followed by git merge FETCH_HEAD (where
FETCH_HEAD points to the tip of the branch that was just fetched).
That's quite a few concepts and commands you've just learnt! It can be a bit hard to keep track of everything and the connections between local and remote Git repositories and how you work with them, but hopefully the following figure will give you a short visual summary:
Quick recap
We have learnt the difference between local and remote copies of git repositories and how to sync them:
git pushuploads commits to a remote repositorygit pulldownloads commits from a remote repository and merges them to the local branchgit fetchdownloads commits from a remote repository without merging them to the local branchgit clonemakes a local copy of a remote repository
Remote branches
Remote branches work much in the same way a local branches, but you have to
push them separately; you might have noticed that GitHub only listed our
repository as having one branch (you can see this by going to the Code tab).
This is because we only pushed our main branch to the remote. Let's create
a new local branch and add some changes that we'll push as a separate branch to
our remote - you should do this in the original git_tutorial repository, so
move back into that directory.
- Create a new branch named
trimmingand add the--trim5 5flag to the bowtie2-command part of theSnakefile, which should now look like this:
shell("bowtie2 --very-sensitive-local --trim5 5 -x " + indexBase + " \
    -U {input.fastq} > {output} 2> {log}")
-
Add and commit the change to your local repository.
-
Instead of doing what we previously did, i.e. merge the
trimmingbranch into themainbranch, we'll pushtrimmingstraight to our remote:
git push origin trimming
- Go the repository at GitHub and see if the new branch has appeared. Just above
the file listing click the Branch drop-down and select the new branch to
view it. Can you see the difference in the
Snakefiledepending on which branch you choose?
We now have two branches both locally and remotely: main and trimming. We
can continue working on our trimming branch until we're satisfied (all the
while pushing to the remote branch with the same name), at which point we want
to merge it into main.
-
Checkout your local
mainbranch and merge it with thetrimmingbranch. -
Push your
mainbranch to your remote and subsequently delete your localtrimmingbranch.
The above command only deleted the local branch. If you want to remove the branch from the remote repository as well, run:
git push origin --delete trimming
Quick recap
We learned how to push local branches to a remote with git push origin
<branch> and how to delete remote branches with git push origin --delete
<branch>.
Sharing tags
Your local repository tags are not included when you do a normal push. To push
tags to the remote you need to supply the --tags flag to the git push
command:
git push --tags
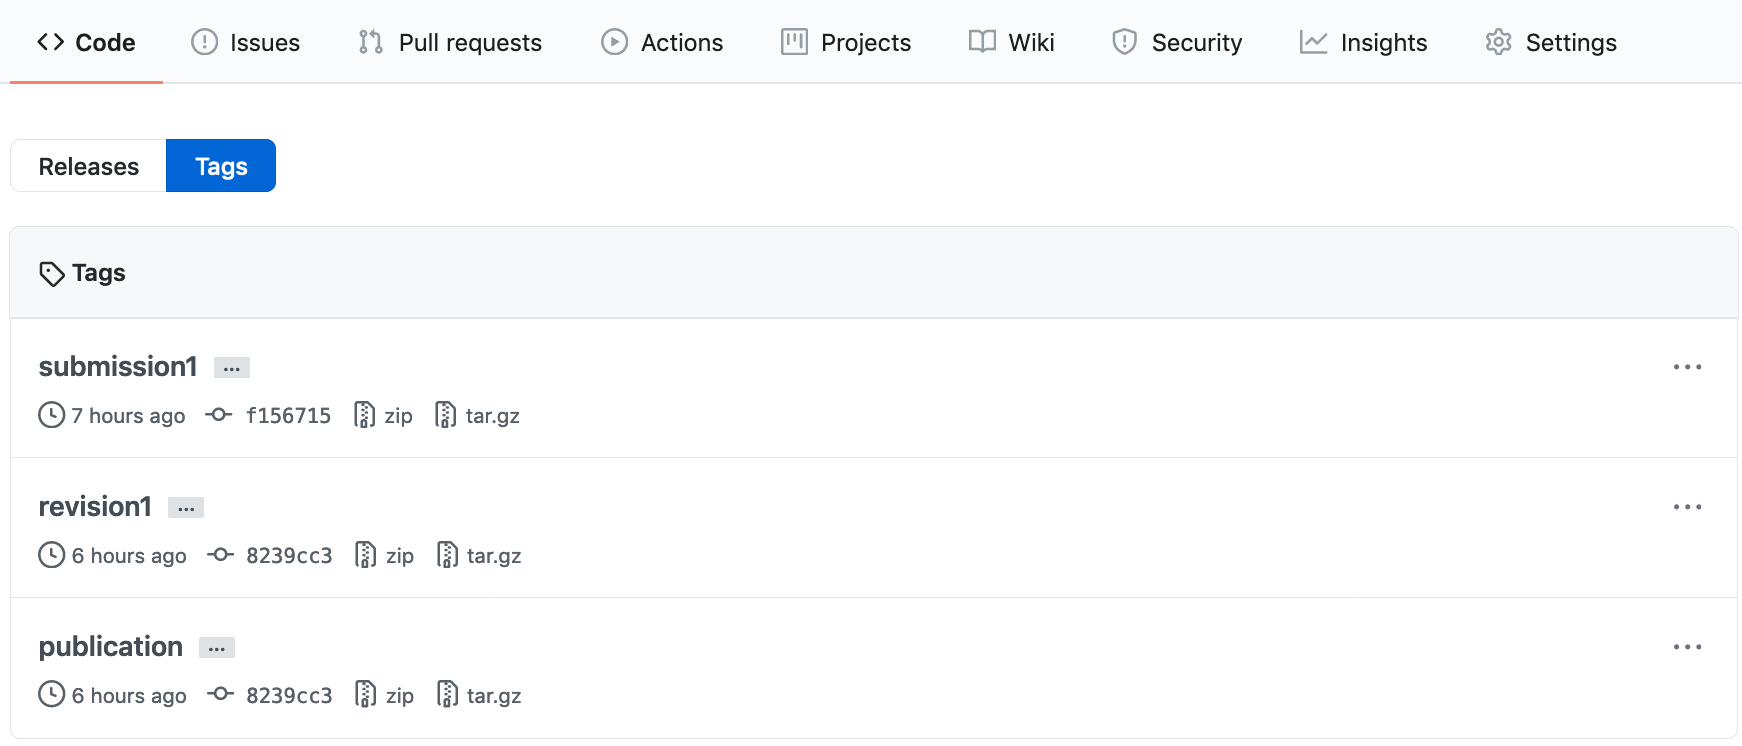
-
Go to the repository overview page on GitHub. You will see that the repository now has three tags! If you click on Tags you will be given an overview of the existing tags for your repository - if you click Releases you will see more or less the same information. Confusing? Well, a tag is a git concept while a release is a GitHub concept that is based on git tags. Releases add some extra features that can be useful for distributing software and are done manually from the repository's GitHub page.
-
Click on one of the tags. Here users can download a compressed file containing the repository at the version specified by the tags.
Alternatively, git users who want to reproduce your analysis with the code used
for the publication can clone the GitHub repository and then run git checkout
publication.
Quick recap
We learned how to push git tags to a remote by using the --tags flag.
Conflicts
It is not uncommon to run into conflicts when you are trying to merge separate branches, and it's even more common when you're working in a collaborative setting with remote repositories. It'll happen sooner or later, even if you're only working locally, so it's important to know how to deal with them! We'll now introduce a conflict on purpose, which we can then solve.
- Remember that we have two separate local copies of the same repository? Let's
go into the first one,
git_tutorial, and change the MultiQC version in theenvironment.ymlfile:
multiqc=1.8
- Add, commit and push your change to the remote.
Now we have a change in our remote and one of our local copies, but not in the other. This could happen if a collaborator of yours committed a change and pushed it to GitHub. Let's create a conflict!
-
Move into your other local repository,
git_remote_tutorial, which doesn't have the new change. Rungit status. Notice that git says: "Your branch is up-to-date with 'origin/main'.". We know that this is not true, but this local clone is not yet aware of the remote changes. -
Let's change the
environment.ymlfile in this local repository as well, but to version 1.6, instead! It may be the case that your collaborator thought it was good to use MultiQC version 1.8, whereas you thought it would be better to use MultiQC version 1.6, but neither of you communicated that to the other. -
Add and commit your change and try to push the commit, which should give you an error message that looks like this:
 ! [rejected]        main -> main (fetch first)
error: failed to push some refs to 'https://github.com/user/git_tutorial.git'
hint: Updates were rejected because the remote contains work that you do
hint: not have locally. This is usually caused by another repository pushing
hint: to the same ref. You may want to first integrate the remote changes
hint: (e.g., 'git pull ...') before pushing again.
hint: See the 'Note about fast-forwards' in 'git push --help' for details.
This error message is thankfully quite informative in regards to what is going on and what might be done about it. In essence it will not allow you to push to the remote since there are conflicting changes made to it.
- Let's download the changes made to the remote, but without trying to merge them directly. This can be done using the following command:
git fetch
Note
The fetch command is very similar to pull in that it downloads remote
changes that are not present locally, but differs in that it doesn't try to
merge them locally; pull both downloads and merges (unless there's
a conflict, in which case it will tell you so and raise an error like the
one above). You can thus skip fetch and just do pull straight away, if
you prefer.
-
Now run
git status. Unlike before, our local git clone now is aware of the latest changes pushed to the remote. It will tell you something along the lines: "Your branch and 'origin/main' have diverged, and have 1 and 1 different commit each, respectively.". -
We can now run the following to see what the difference is between the current state of our local clone and the
mainbranch on the remote origin:
git diff origin/main
- Now let's try to integrate the remote changes with our local changes and get up to sync with the remote:
git pull origin main
Unsurprisingly, the git pull command resulted in a conflict. Git tells us
about this and suggests that we should fix the conflicts and commit that.
- As always, run
git statusto get an overview: you will see that you have so-called unmerged paths and that the conflicting file isenvironment.yml, since both modified the same line in this file. To fix a conflict, open the affected file in a text editor. You will see that it now looks something like this:
channels:
  - conda-forge
  - bioconda
  - main
  - r
dependencies:
  - python=3.7.6
  - fastqc=0.11.9
  - sra-tools=2.10.1
  - snakemake-minimal=5.10.0
<<<<<<< HEAD
  - multiqc=1.6
=======
  - multiqc=1.8
>>>>>>> eb1bda9f9d089289e5bd82e15d36e34a88a04879
  - bowtie2=2.2.4
  - samtools=1.10
  - htseq=0.11.2
  - bedtools=2.29.2
  - wget=1.20.1
  - graphviz=2.42.3
  - r-base=3.6.2
  - r-ggplot2=3.2.1
  - r-reshape2=1.4.3
  - r-stringi=1.4.5
  - r-pheatmap=1.0.12
  - r-rmarkdown=2.1
  - bioconductor-rtracklayer=1.46.0
  - bioconductor-geoquery=2.54.0
  - xorg-libxrender
  - xorg-libxpm
The part between <<<<<<< HEAD and ======= is your local version, and the
part between ======= and >>>>>>> eb1bda9f9d089289e5bd82e15d36e34a88a04879 is
the one added to the remote and which caused the conflict when you tried to pull
those changes to your local repository. The long sequence of characters is the
commit ID (the first 7 are displayed on GitHub under Commits), which will be
different for your repository. It is now up to you to decide which version to
keep, or to change it to a third alternative.
- Let's say that you are confident that it is better to run MultiQC 1.6 rather
than 1.8. Edit the file so that it looks like you want it to, i.e. remove
the lines added by git and delete the line with
multiqc=1.8. The final file should look like this:
channels:
  - conda-forge
  - bioconda
  - main
  - r
dependencies:
  - python=3.7.6
  - fastqc=0.11.9
  - sra-tools=2.10.1
  - snakemake-minimal=5.10.0
  - multiqc=1.6
  - bowtie2=2.2.4
  - samtools=1.10
  - htseq=0.11.2
  - bedtools=2.29.2
  - wget=1.20.1
  - graphviz=2.42.3
  - r-base=3.6.2
  - r-ggplot2=3.2.1
  - r-reshape2=1.4.3
  - r-stringi=1.4.5
  - r-pheatmap=1.0.12
  - r-rmarkdown=2.1
  - bioconductor-rtracklayer=1.46.0
  - bioconductor-geoquery=2.54.0
  - xorg-libxrender
  - xorg-libxpm
- Run
git statusagain. Notice that it saysuse "git add <file>..." to mark resolution? Let's do that!
git add environment.yml
- Run
git statusagain! It will now tell us:All conflicts fixed but you are still merging. (use "git commit" to conclude merge). So, you probably guessed it, run:
git commit -m "Merge and set multiqc to v1.6"
- Finally, push these changes to GitHub:
git push
- Go to GitHub in the browser and click the commit tracker again. You will see
a list of commits including where MultiQC was first changed to version
1.2from our previous work, then to1.8,1.6and, finally, followed by a merge where the version was set to1.6.
Note
While the example we've used here is from a collaborative setting, conflicts
also arise when you are working alone. They usually happen when you have
several feature branches that you want to merge into main and you've
forgot to keep all branches up-to-date with each other.
Quick recap
We learned about how conflicting commits can happen and how to deal with them by inspecting the affected files and looking for the source of the conflict.
Extra material
The following extra material contains some more advanced things you can do with git and the command line in general, which is not part of the main course materials. All the essential skills of git are covered by the previous sections; the material here should be considered tips and tricks from people who use git every day. You thus don't need to use these things unless you want to, and you can even skip this part of the lesson if you like!
Decorating your prompt
When you are working on the command line interface (CLI), you will usually have some small pieces of information relating to your current directory, the name of the computer or host you're working on, and so forth. You've probably already seen your prompt while working with git throughout this lesson, but here's an example of what one might look like:
erikfmbp:~/teaching/workshop-reproducible-research erik.fasterius $
The above prompt contains the name of the computer, a colon, the current
working directory, the username and a dollar-sign; it is stored in the
variable PS1. You can type echo $PS1 to see what variables your prompt
is made up of; the above example contains \h:\W \u\$, where \h is the
hostname, \W the working directory and \u the username.
Some people like to also show the current branch on their prompt, thus avoiding
having to type git branch continuously. There are several ways you might do
this, and we're only presenting one of them here: a bash function.
git_branch() {
     git branch 2> /dev/null | sed -e '/^[^*]/d' -e 's/* \(.*\)/ (\1)/'
}
This function does a number of things:
- Ejects the error message from git if the current directory isn't a part of a
git repository into
/dev/null(i.e. into nothing). - Find the current branch by searching for a line that starts with
*(i.e. the current branch) using the command line programsed. - Put the current branch into parentheses with a space before it.
We can then build our new prompt by adding this function into it:
# The first part of the old prompt
PS1='\h:\W \u'

# Add the git branch
PS1=$PS1'$(git_branch)'

# Add the last part of the old prompt
PS1=$PS1' \$'
Now you should see the current git branch on your prompt! The only problem now
is that this only works for your current session: once you restart your CLI
you'll have to re-define your prompt again. This can be circumvented, though.
What you need to do is to add the code defining your prompt into your so-called
bash profile: ~/.bash_profile. Every time you load a new CLI session this
file is read and any code inside it is executed. You might already have this
file, so make sure you don't overwrite it!
Bash aliases for git
Some git commands are used over and over again when working with git, such as
git status. Some people like to have aliases (i.e. shortcuts) for these
common commands. Here is a small list of such aliases that you may find useful
or, even better, might inspire you to create your own! Add them to your
~/.bash_profile as above, so that they're available across sessions.
# Basic git commands
alias gb='git branch'
alias ga='git add'
alias gd='git diff'
alias gcm='git commit'
alias gp='git push'
alias gu='git pull'
alias gm='git merge'
alias gco='git checkout'
alias gl='git log'

# Git status in short format
alias gst='git status -s'

# Add and commit all tracked and modified files
alias gca='git commit -a'

# Create and checkout a new branch
alias gcob='git checkout -b'

# Git log with one line per commit
alias glo='git log --oneline'
Remote connections with SSH
Throughout this tutorial we have been using normal HTTPS to connect with remote repositories, which means you need to provide your username and password. If you work with remote repositories a lot you might want to be able to skip writing in your user credentials all the time, which is something you can do with SSH (Secure Shell) keys. This basically entails setting up a pair of keys: one private and one public. You keep the private key on your local computer and give the public key to anywhere you want to be able to connect to, e.g. GitHub. The public key can be used to encrypt messages that only the corresponding private key can decrypt. A simplified description of how SSH authentication works goes like this:
- The client (i.e. the local computer) sends the ID of the SSH key pair it would like to use for authentication to the server (e.g. GitHub)
- If that ID is found, the server generates a random number and encrypts this with the public key and sends it back to the client
- The client decrypts the random number with the private key and sends it back to the server
Notice that the private key always remains on the client's side and is never transferred over the connection; the ability to decrypt messages encrypted with the public key is enough to ascertain the client's authenticity. This is in contrast with using passwords, which are themselves send across a connection (albeit encrypted). It is also important to note that even though the keys come in pairs it is impossible to derive the private key from the public key.
So, how do you setup SSH authentication between your local computer and GitHub? GitHub actually has excellent and detailed instructions for exactly this at the GitHub website, so we won't repeat that here. Simply follow those instructions and you'll be good to go! If you want to read more details about how SSH authentication work you can check out this website, which has more in-depth information than we provide here.
Forking
When you want to work on an Open Source project that is available on e.g. GitHub, you usually don't have permission to directly push code to the project's repository - this is so that the project's maintainers are the only ones that can directly change anything in their codebase. How do you then contribute to projects that don't allow you to push your code to their repository? Simple: use forking!
Forking is when you make your own copy of a repository on your GitHub account, which you will then have permissions to change as you see fit. You can then create pull requests from your fork to the original repository, rather than pushing code to a new branch and making a pull request from that. Working with forks just adds an additional step to the whole workflow: instead of being "clone; code and commit changes on a new branch; push branch to remote; pull request from branch" it becomes "fork; clone; code and commit changes; push code to fork; pull request from fork".
You might also want to do a fork of a project simply because you want to have your own copy of it as well, without ever having the intention of changing it. This is, of course, perfectly fine as well, but do keep in mind that developers are usually quite happy to incorporate new changes from contributors if they are reasonable and fulfil a purpose and add functionality to the project. It is quite common that you have a use-case the maintainer didn't think of before, and that you've helped the project grow by contributing your code!